Koha How-To
Working with the Biblio API Endpoint
 by Lucas Gass on Apr 30, 2021
Koha API’s are continuing to get better and better and we are now at the point, in 20.05, where we can expose the MARC record of a given bibliographic record in both the staff client and the Koha OPAC.
This makes for the possibility of some exciting customizations using the biblio API endpoint and jQuery. In some cases this jQuery can completely replace the need for custom XSLT stylesheets. Let’s go through the basics.
There are two separate routes for accessing the biblio end point in Koha, one for the staff client and one for the OPAC.
Staff client: https://staff.yourlibrary.com/api/v1/biblios/{biblio_id}
OPAC: https: https:catalog.yourlibrary.com/api/v1/public/biblios/{biblio_id}
In both cases the {biblio_id} should be the biblionumber of a record. Your actual links should look something like this: https://staff.yourlibrary.com/api/v1/biblios/55. If the biblionumber ‘55’ exists in your catalog you should see a page like this when you click the link:
That doesn’t seem very helpful but if we apply some jQuery we’ll get something much more exciting! Let’s do something fairly simple. The following code can be added to either OPACUserJS or IntranetUserJS, depending on whether you are working on the staff client or the OPAC. In this case we are going to work with the staff client:
let biblionum = 1;
let url = `/api/v1/biblios/${biblionum}`
$.ajax({
type: "GET",
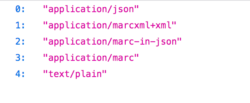
accepts: {
"*": "application/marc-in-json"
},
url: url,
complete: function(data) {
console.log(data.responseJSON);
}
});
A tad confusing still. Let’s change our jQuery just a bit so we can drill down a little deeper inside of this object.
From this:
complete: function(data) {
 console.log(data.responseJSON);
}
To this:
complete: function(data) {
 console.log(data.responseJSON.fields);
 console.log(data.responseJSON.leader)
}
Now we are console logging two things:
data.responseJSON.leader, this should return a string containing the leader from the record. I should return a string similar to this example: ‘01344cam a22003014i 4500’.
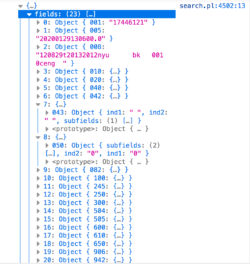
data.responseJSON.fields, this should return an array of objects. Each object in this array represents a MARC field and is labeled as such. The contents of each object can differ depending on the MARC field but generally we have an ind1, ind2, and subfield. ind1 and ind2 are strings that represent whether or not the given indicator is 1 or 0. The subfield is actually another array of objects! This object represents the data of each subfield in the record, and generally this is the information we will want to extract.
If all these objects, arrays, and arrays of objects seem daunting don’t worry, now we are going to provide some jQuery to access each of the data in those subfields. We are going to use the 700 fields as examples. In my case I have 3 subfields listed in this order: 700$a, 700$q, and 700$d.
if ($('#catalog_detail').length) {
 let url = `/api/v1/biblios/55`;
 $.ajax({
 type: "GET",
 accepts: {
 "*": "application/marc-in-json"
 },
 url: url,
 complete: function(data) {
 data.responseJSON.fields.forEach(function(item) {
 if (Object.keys(item)[0] == '700') {
 let the_subfields = item['700']['subfields'];
 console.log(the_subfields[0]['a']);
 console.log(the_subfields[1]['q']);
 console.log(the_subfields[2]['d']);
 }
 })
 }
 });
}
Now if you look at your console you should see the 700$a, 700$q, and 700$d listed in order! Let's break that down a bit more. In the example we are simplicity logging the output to the browser’s console with the lines like:
console.log(the_subfields[0]['a']);
the_subfields is a shorthand way of saying “item['700']['subfields']’, which is any JavaScript object inside the array of 700 fields. The [0] represents the first object and the [‘a’] represents the ‘a’ subfield, 700$a in this case. Since the 700$q is the 2nd 700 field we access it with the following syntax:
console.log(the_subfields[1]['q']);
And the 700$d, being 3rd, is accessed like so:
console.log(the_subfields[2]['d']);
Console logging your data was never the ultimate goal, so now let’s add some of the 700 data to the Koha staff client, we are going to be working with the staff client detail page in this example. Basically all we have to do is replace our console.log with a jQuery insertAfter() function. I like insertAfter() because it allows us to use this selector ( $(‘.results_summary:last’) ) . That way we can also add our new fields below the last .results_summary element.
Here is the final code for adding the 700 fields to the staff client detail page. Take note of the fact that we are no longer statically setting the URL with biblionumber 55, instead we are using the JavaScript URL constructor to extract the correct biblionumber from the current page's URL:
if ($('#catalog_detail').length) {
 let url = new URL(window.location.href);
 let biblio_number = url.searchParams.get('biblionumber');
 let api_url = `/api/v1/public/biblios/${biblio_number}`;
 $.ajax({
 type: "GET",
 accepts: {
 "*": "application/marc-in-json"
 },
 url: url,
 complete: function(data) {
 data.responseJSON.fields.forEach(function(item) {
 if (Object.keys(item)[0] == '700') {
 let the_subfields = item['700']['subfields'];
 $(`<span class="results_summary bibliographic_note"><span class="label">The 700$a: </span>${the_subfields[0]['a']}</span>`).insertAfter($('.results_summary:last'));
 $(`<span class="results_summary bibliographic_note"><span class="label">The 700$q: </span>${the_subfields[1]['q']}</span>`).insertAfter($('.results_summary:last'));
 $(`<span class="results_summary bibliographic_note"><span class="label">The 700$d: </span>${the_subfields[2]['d']}</span>`).insertAfter($('.results_summary:last'));
 }
 })
 }
 });
}
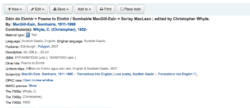
If you look at the record detail page you should now see the exposed 700 fields!
Read more by Lucas Gass