Koha How-To
Using the Label Plugin in Koha Part 2
 by Kelly McElligott on Feb 6, 2019
In our last tutorial video and blog post on the new Label Plugin, Jessie and I went through the new label plugin. This was a great overall video to highlight the components of the plugin and the functionality.
Let's Edit
This tutorial video and blog post will cover editing the existing templates and layouts that come with the label plugin. We are joined by Lucas, our web designer, who has some good resources for helping partners use this plugin.
Editing the Layout
The layout is set up for the size of the label and sheet, but also for the type of font used and color. The Basix layout that comes with the plugin includes color to each set of labels, to make it easier to determine which to edit. However, when you are ready to print your labels, you probably won't want them in color!
Jessie showed us how to remove the color from the layout, by removing the line :
background-color: red;
But remember, we emphasized to make a copy of the layout (and also can be done in templates also) first! To make a copy of the layout is found under the actions, and is super handy to do!
Next step was editing the font. If there is no Font listed on the layout, then it will print in Times New Roman. However, a font can be easily added or changed in the layout.
Jessie walked through adding the font of Verdana to the layout right under the body/width section:
A little bit more detail about the structure of the layout:
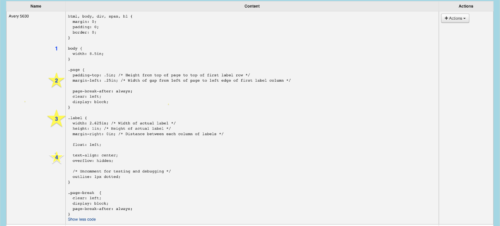
Here you can see a few details to be aware of (however if you have used the label creator - same information, but presented in a different way)
- This is the size of the paper.
- This is the padding around the paper before the label begins. So measurements of the top and left hand side of paper.
- The size of the label itself: width, height, and margin of labels.
- How to display the text, in this example it is in the center.
- Below there is a comment field that it includes a dotted line to show on a test where the labels live on the screen.
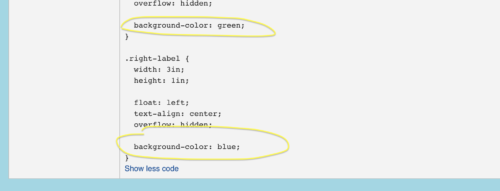
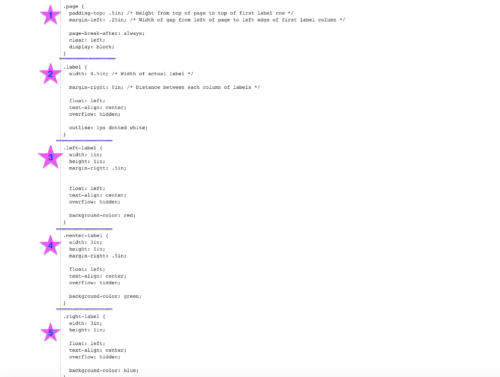
Below are images of both the Avery Layout and the Basix Layout- more layouts are listed on the Basix because unlike the Avery, the Basix layout has the dimensions for three labels.
In the Basix layout displayed below, there is a little bit of code at the top and the bottom that this image does not display due to the largeness of the screenshot.
Both 1 & 2 are the construction of the sheet itself. This is the page and padding of their physical sheet of labels.
3. This is the dimensions of the left side label, including formatting of text and the color of the label which can be removed.
4. This is the dimensions of the center label, including the formatting of the text (such as center) and the color of the label which can be removed.
Editing the Template
Libraries use a variety of combinations on their spine labels, barcodes, etc. To edit this information, this can be done in the label template.
Jessie walked through the steps of removing the title from the template and replacing it with the item call number.
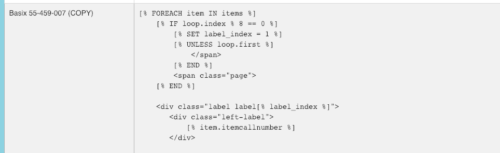
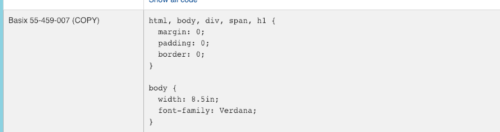
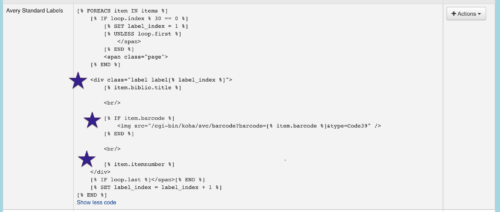
Looking closely at the Avery Template (there is a place to see all the code)- you can see what details are included in this template: title, barcode, itemnumber
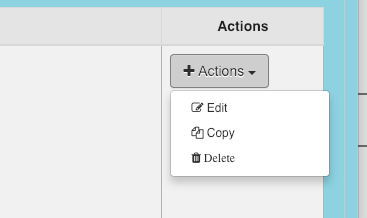
1. If editing is desired to change this particular template, there is an action button over to the right which can bring up the option to edit, copy or delete. I have always been a fan of COPY if given the option as there is in Koha reports- so as to not lose the template the works! Editing will open up this same page, but give the user the ability to adjust the code.
2. If copy is chosen from the action menu, the template will be duplicated. Remember to give your template a new name, as to not mix them up.
3. Another option as opposed to editing this from here, there is the ability to create a new template using the Label Wizard* at the top of this page. The wizard will do the heavy lifting (or in the case the detailed coding).
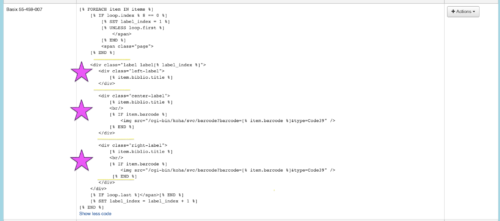
Now let’s look at the next template- the multi-size label sheet. Same principles as above - this template can be edited, copied or deleted. Let’s look more closely at this template and what it will display from what is in the template:
Splitting Call Numbers
Jessie asked a great question about call number splitting! Thank goodness we had an expert web designer on the video with us! Lucas does have a way to split the call number a space or a period. However, if you are a partner of Bywater Solutions and need assistance with this, please submit a ticket! Lucas is happy to help. Here is the code that he added to the template that needed the call number split:
$(document).ready(function () {
$('.label').each(function() {
let theText = $(this).text();
let theNewText = theText.trim().replace(/\s+/g, '
').replace('.' , '
.');
$(this).html(theNewText);
})
});
This code was added into the template- here is a look at the entire code of the template to get a better understanding of where it goes:
[% FOREACH item IN items %]
[% IF loop.index % 1 == 0 %]
[% SET label_index = 1 %]
[% UNLESS loop.first %]
[% END %]
[% END %]
[% item.marc.subfield('949','a') %]
[% IF loop.last %][% END %]
[% SET label_index = label_index + 1 %]
[% END %]
$(document).ready(function () {
$('.label').each(function() {
let theText = $(this).text();
let theNewText = theText.trim().replace(/\s+/g, '
').replace('.' , '
.');
$(this).html(theNewText);
})
});
Video Tutorial
Video Notes
Link to Part 1 of the Label Plugin Tutorial Video and Blog Post
Links that Lucas mentioned about Web Safe fonts
Correct Pronunciation of the Font Verdana
Read more by Kelly McElligott